Filters & Lubrication
ENGINE OIL AND FILTER
Refer to Maintenance Precautions on page 69. Engine oil quality is the chief factor affecting engine service life. Change the engine oil as specified in the maintenance schedule on page 65.
Changing the oil filter requires a special oil filter tool and a torque wrench. If you do not have these tools and the necessary skill, we recommend that you have your authorized Honda dealer perform this service. If a torque wrench is not used for this installation, see your authorized Honda dealer as soon as possible to verify proper assembly.
CAUTION:
- Used engine oil may cause skin cancer if repeatedly left in contact with the skin for prolonged periods. Although this is unlikely unless you handle used oil on a daily basis, it is still advisable to thoroughly wash your hands with soap and water as soon as possible after handling used oil.
NOTE:
- Please dispose of used engine oil in a manner that is compatible with the environment. We suggest you take it in a sealed container to your local service station for reclamation. Do not throw it in the trash or pour it on the ground or down a drain.
- Change the engine oil with the engine at normal operating temperature and the motorcycle on its center stand to assure complete and rapid draining.
To drain the oil:
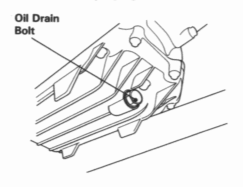
- Remove the front lower cover (page 72). Remove the oil filler cap (page 27) and oil drain bolt.

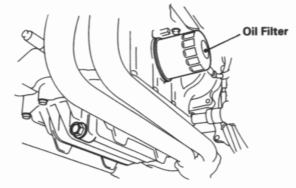
- Remove the oil filter with a filter wrench. Discard the oil filter.

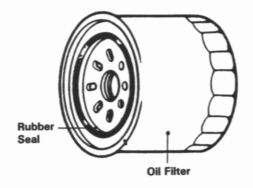
- Apply a thin coat of engine oil to the rubber seal on the new oil filter.

- Using a special tool and a torque wrench, install the new oil filter and tighten it to the specified torque: 10 N-m (1.0 kgf-m, 7 Ibf-ft) Use only the Honda genuine oil filter or a filter of equivalent quality specified for your model. Using the wrong Honda filter or a non-Honda filter which is not of equivalent quality may cause engine damage.
- Check that the sealing washer on the drain plug is in good condition. Replace the sealing washer every other time the oil is changed, or each time if necessary. Install the drain bolt and tighten it to the specified torque: 37 N-m (3.8 kgf-m, 27 Ibf-ft)
- Fill the crankcase with approximately 3.6 liters (3.8 US qt, 3.2 Imp qt) of the recommended oil (page 28).
- Install the oil filler cap.
- Start the engine and let it idle for a few minutes.
- Stop the engine. Make sure the oil level is at the upper level mark on the inspection window (page 27) and there are no oil leaks.
NOTE:
- When running in very dusty conditions, oil changes should be performed more frequently than specified in the maintenance schedule.
AIR CLEANER
Refer to Maintenance Precautions on page 69. The air cleaner should be serviced at regular intervals (page 65). Service more frequently when riding in unusually wet or dusty areas.
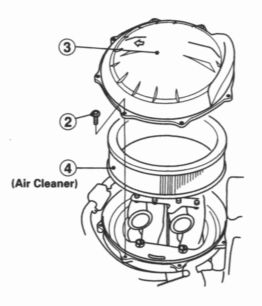
- Remove the parts in sequence, according to the order in the illustration.
NOTE: Be careful not to break any tabs.
- Remove the air cleaner and discard it.
- Install a new air cleaner. Use the Honda genuine air cleaner or an equivalent air cleaner specified for your model. Using the wrong Honda air cleaner or a non-Honda air cleaner which is not of equivalent quality may cause premature engine wear or performance problems.
- Install removed parts in the reverse order of removal.
NOTE:
- Make sure to engage all tabs and to secure all fasteners.
The numbers indicate the sequence of disassembly. (1) Remove the top cover (page 72).
