Major Components
(Information you need to operate this motorcycle)
REAR SUSPENSION
Spring preload adjustment:
The rear shock absorber has five adjustment positions for different load or riding conditions. Remove the right saddlebag (page 42) and right side cover (page 71). Use the pin spanner in the tool kit to adjust the rear shock.
- Position 1 is for a light load and smooth road conditions.
- Position 2 is the standard position.
- Positions 3 to 5 increase spring preload for a stiffer rear suspension, and can be used when the motorcycle is more heavily loaded.

Rebound Damping adjustment:
The rebound damping adjuster has four adjustment positions. To adjust to the standard position, proceed as follows:
- Turn the adjuster clockwise until it stops.
- Turn the adjuster counterclockwise 1 turn (model equipped with CBS/ABS/TCS: 1/2 turn) to align the punch mark on the adjuster with the reference mark.

Recommended adjuster positions:
| CONDITIONS | REBOUND DAMPING Turn clockwise from standard position |
SPRING PRELOAD |
|
| Rider | Cargo | ||
| One | - | 0° (no adjustment) | 1 or 2 |
| One | Cargo | 180° (1/2 turn) | 3 |
| Two | - | 270° (3/4 turn) | 4 |
| Two | Cargo | 270° or 360° (3/4 to 1 full turn) | 5 |
For model equipped with CBS/ABS/TCS:
| CONDITIONS | REBOUND DAMPING Turn clockwise from standard position |
SPRING PRELOAD |
|
| Rider | Cargo | ||
| One | - | 0° (no adjustment) | 1 or 2 |
| One | Cargo | 0° (no adjustment) | 3 |
| Two | - | 90° (1/4 turn) | 4 |
| Two | Cargo | 90° or 180° (1/4 to 1/2 turn) | 5 |
BRAKES
Both front and rear brakes are hydraulic disc types. As the brake pads wear, the brake fluid level will drop. Therefore, the brake fluid level and pad wear must be inspected periodically. The system must be inspected frequently to ensure there are no fluid leaks. If the control lever or pedal free travel becomes excessive and the brake pads are not worn beyond the recommended limit (page 93), there is probably air in the brake system and it must be bled. See your authorized Honda dealer for this service.
Brake Fluid Level:
- Brake fluid may cause irritation. Avoid contact with skin or eyes. In case of contact, flush thoroughly with water and call a doctor if your eyes were exposed.
- KEEP OUT OF REACH OF CHILDREN.
CAUTION:
- When adding brake fluid, be sure the reservoir is horizontal before the cap is removed or brake fluid may spill out.
- Use only DOT 4 brake fluid from a sealed container.
- Never allow contaminants such as dirt or water to enter the brake fluid reservoir.
- Handle brake fluid with care because it can damage plastic and painted surfaces.
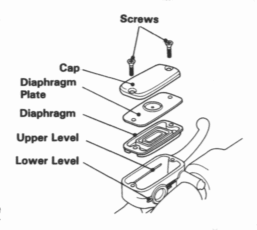
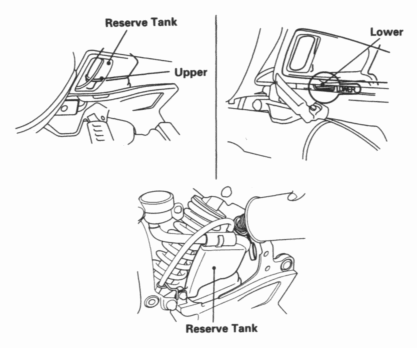
Check that the fluid level is above the LOWER level mark with the motorcycle in an upright position. Brake fluid must be added to the reservoir whenever the fluid level begins to reach the LOWER level mark.
Front Brake
The front brake motor cylinder is located on the right handlebar. Fill the reservoir with DOT 4 BRAKE FLUID from a sealed container up to the upper level mark. Reinstall the removed parts in the reverse order of removal. Tighten the screws securely.

Rear Brake
- Remove the right saddlebag (page 42) and right side cover (page 71).
- Remove the cap.
- Fill the reservoir with DOT 4 BRAKE FLUID from a sealed container up to the upper level mark.
- Reinstall the removed the cap.

Other Checks:
Make sure there are no fluid leaks. Check for deterioration or cracks in the hoses and fittings.
Front Brake Lever:
The distance between the tip of the brake lever and the grip can be adjusted by turning the adjuster.
CAUTION:
Align the arrow on the brake lever with the index mark on the adjuster.
CLUTCH
This motorcycle has a hydraulically actuated clutch. There are no adjustments to perform but the clutch system must be inspected periodically for fluid level and leakage. If the control lever freeplay becomes excessive and the motorcycle creeps or stalls when shifted into gear, or if the clutch slips, causing acceleration to lag behind engine speed, there is probably air in the clutch system and it must be bled out. See your authorized Honda dealer for this service.
Fluid level:
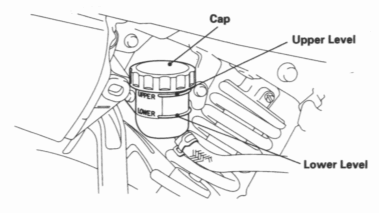
Check that the fluid level is above the LOWER level mark. If the fluid level is near the LOWER level mark, it indicates fluid leakage. See your authorized Honda dealer for repair.
Other Checks:
Make sure there are no fluid leaks. Check for deterioration or cracks in the hose and fittings.

COOLANT
Coolant Recommendation
The owner must properly maintain the coolant to prevent freezing, overheating, and corrosion. Use only high quality ethylene glycol antifreeze containing corrosion protection inhibitors specifically recommended for use in aluminum engines. (SEE ANTIFREEZE CONTAINER LABEL).
CAUTION:
Use only low-mineral drinking water or distilled water as a part of the antifreeze solution. Water that is high in mineral content or salt may be harmful to the aluminum engine.
The factory provides a 50/50 solution of antifreeze and water in this motorcycle. This coolant solution is recommended for most operating temperatures and provides good corrosion protection. A higher concentration of antifreeze decreases cooling system performance and is recommended only when additional protection against freezing is needed. A concentration of less than 40/60 (40% antifreeze) will not provide proper corrosion protection. During freezing temperatures, check the cooling system frequently and add higher concentrations of antifreeze (up to a maximum of 60% antifreeze) if required.
Inspection
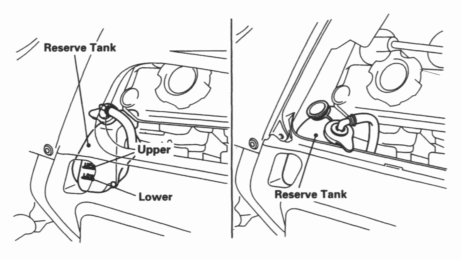
The coolant reserve tank is behind the right side cover (right side cowl for model equipped with CBS/ABS/TCS). Check the coolant level in the reserve tank while the engine is at normal operating temperature. If the coolant is low, remove the right side cover (page 71) or air duct/maintenance cover (page 71) and add coolant to the reserve tank as required to bring the coolant level to the UPPER level mark. If the reserve tank is empty, or if coolant loss is excessive, check for leaks and see your authorized Honda dealer for repair.
- Do not remove the radiator cap when the engine is hot. The coolant is under pressure and could scald you.
- Keep hands and clothing away from the cooling fan, as it starts automatically.

Model equipped with CBS/ABS/TCS:

FUEL
Automatic Fuel ON-OFF
Fuel will flow to the carburetors only when the engine is started or is running.
Fuel Tank
Fuel tank capacity is 28 I (7.4 US gal, 6.1 Imp gal). Insert the ignition key and turn it clockwise to open the fuel filler compartment. Turn the fuel fill cap counterclockwise to remove it.

Use unleaded or low-lead petrol with a research octane number of 91 or higher. We recommend that you use unleaded petrol because it produces fewer engine and spark plug deposits and extends the life of exhaust system components.
FOR AUSTRALIA ONLY:
Use unleaded petrol with a research octane number of 91 or higher.
Never use stale or contaminated petrol or an oil/petrol mixture. Avoid getting dirt, dust or water in the fuel tank. Use of a lower octane petrol can cause persistent "pinging" or heavy "spark knock" (a metallic rapping noise) which, if severe, can lead to engine damage.
CAUTION:
If "spark knock" or "pinging" occurs at a steady engine speed under normal load, change brands of petrol. If spark knock or pinging persists, consult your authorized Honda dealer. Failure to do so is considered misuse, and damage caused by misuse is not covered by Honda's Limited Warranty.
Occasionally you may experience light spark knock while operating under heavy loads. This is no cause for concern, it simply means your engine is operating efficiently. Install the fuel fill cap by turning it clockwise. Be sure to properly route the hose attached to the top of the cap. Close the fuel filler compartment lid with the key inserted and turned clockwise, then turn the key counterclockwise to lock the lid.
- Petrol is extremely flammable and is explosive under certain conditions. Refuel in a well-ventilated area with the engine stopped. Do not smoke or allow flames or sparks in the area where petrol is stored or where the fuel tank is refueled.
- Do not overfill the tank (there should be no fuel in the filler neck). After refueling, make sure the tank cap is closed properly and securely.
- Be careful not to spill fuel when refueling. Spilled fuel or fuel vapor may ignite. If any fuel is spilled, make sure the area is dry before starting the engine.
- Avoid repeated or prolonged contact with skin or breathing of vapor. KEEP OUT OF REACH OF CHILDREN.
Petrol Containing Alcohol
If you decide to use a petrol containing alcohol (gasohol), be sure its octane rating is at least as high as that recommended by Honda. There are two types of "gasohol": one containing ethanol, and the other containing methanol. Do not use gasohol that contains more than 10% ethanol. Do not use petrol containing methanol (methyl or wood alcohol) that does not also contain cosolvents and corrosion inhibitors for methanol. Never use petrol containing more than 5% methanol, even if it has cosolvents and corrosion inhibitors.
NOTE:
- Fuel system damage or engine performance problems resulting from the use of fuels that contain alcohol are not covered under the warranty. Honda cannot endorse the use of fuels containing methanol since evidence of their suitability is as yet incomplete.
- Before buying fuel from an unfamiliar station, try to find out if the fuel contains alcohol. If it does, confirm the type and percentage of alcohol used. If you notice any undesirable operating symptoms while using a petrol that contains alcohol, or one that you think contains alcohol, switch to a petrol that you know does not contain alcohol.
ENGINE OIL
Check engine oil level each day before operating the motorcycle.
To check the oil level:
- Place the motorcycle on its center stand on firm, level ground.
- Start the engine and let it idle for a few minutes.
- Stop the engine. After a few minutes, check the oil level inspection window. The oil level should be between the upper and lower level marks.
- If required, remove the air duct/maintenance cover (page 71) and oil filler cap, add the specified oil up to the upper level mark. Do not overfill.
- Reinstall the oil filler cap and the air duct/maintenance cover (If removed).
CAUTION:
Running the engine with insufficient oil can cause serious engine damage.

Engine Oil
Good engine oil has many desirable qualities. Use only high detergent, quality motor oil certified on the container to meet or exceed requirements for API Service Classification SE, SF or SG.
Viscosity
Viscosity grade of engine oil should be based on average atmospheric temperature in your riding area. The following provides a guide to the selection of the proper grade or viscosity of oil to be used at various atmospheric temperatures.

FINAL DRIVE OIL
Oil Level Check
Check the final drive oil level when specified by the maintenance schedule.
- Place the motorcycle on its center stand on firm, level ground.
- Remove the oil filler cap.
- The oil level should be flush with the lower edge of the oil filler hole.
NOTE:
If the level is low, check for leaks. Add the recommended oil through the oil filler hole until it reaches the lower edge of the opening.
Recommended Oil: HYPOID GEAR OIL SAE 80

TUBELESS TYRES
This motorcycle is equipped with tubeless tyres, valves, and wheel rims. Use only tyres marked "TUBELESS" and tubeless valves on rims marked "TUBELESS TYRE APPLICABLE." Never mount tyres designed for use on automobiles on a motorcycle rim.
Any attempt to mount passenger car tyres on a motorcycle rim may cause the tyre bead to separate from the rim with enough explosive force to cause serious injury or death.
Proper air pressure will provide maximum stability, riding comfort and tyre life. Check tyre pressure frequently and adjust if necessary.
NOTE:
- Tyre pressure should be checked before you ride while the tyres are "cold."
- Tubeless tyres have some degree of self-sealing ability if they are punctured, and leakage is often very slow. Inspect very closely for punctures, especially if the tyre is not fully inflated.
| Front | Rear | ||
| TYRE SIZE TYRE BRAND TUBELESS ONLY DUNLOP BRIDGESTONE |
110/80-18 58V D103F G547 |
160/70-17 73V D103 G548 |
|
| TYRE SIZE TYRE BRAND TUBELESS ONLY METZLER |
110/80-18 58V ME33 LASER |
160/70 B17 73V ME55A METRONIC |
|
| Cold tyre pressures psi (kPa, kgf/cm2) | Up to 90 kg (200 lbs) load | 36 (250, 2.50) | 42 (290, 2.90) |
| 90 kg (200 lbs) load to vehicle capacity load | 36 (250, 2.50) | 42 (290, 2.90) | |
Model equipped with CBS/ABS/TCS:
| Front | Rear | ||
| TYRE SIZE TYRE BRAND TUBELESS ONLY DUNLOP BRIDGESTONE |
120/70 ZR18 (59W) D202F BT-54F |
160/70 ZR17 (73W) D202 BT-54R |
|
| Cold tyre pressures psi (kPa, kgf/cm2) | Up to 90 kg (200 lbs) load | 36 (250, 2.50) | 42 (290, 2.90) |
| 90 kg (200 lbs) load to vehicle capacity load | 36 (250, 2.50) | 42 (290, 2.90) | |
Check the tyres for cuts, embedded nails or other sharp objects. Check the rims for dents or deformation. If there is any damage, see your authorized Honda dealer for repair, replacement, and balancing.
- Improper tyre inflation will cause abnormal tread wear and create a safety hazard. Underinflation may result in the tyre slipping on, or coming off of the rim causing tyre deflation that may result in a loss of vehicle control.
- Operation with excessively worn tyres is hazardous and will adversely affect traction and handling.
Replace tyres before tread depth at the center of the tyre reaches the following limit or when the surface is flush with the wear indicators.
| Minimum tread depth | |
|---|---|
| Front: | 1.5 mm (0.06 in) |
| Rear: | 2.0 mm (0.08 in) |
NOTE: <For Germany>
German law prohibits use of tyres whose tread depth is less than 1.6 mm.

Tyre Repair/Replacement
See your authorized Honda Dealer.
- The use of tyres other than those listed on the tyre information label may adversely affect handling.
- Do not install tube-type tyres on tubeless rims. The beads may not seat and the tyres could slip on the rims, causing tyre deflation that may result in a loss of vehicle control.
- Any attempt to mount passenger car tyres on a motorcycle rim may cause the tyre bead to separate from the rim with enough explosive force to cause serious injury or death.
- Do not install a tube inside a tubeless tyre. Excessive heat build-up may cause the tube to burst resulting in rapid tyre deflation that may result in a loss of vehicle control.
- Proper wheel balance is necessary for safe, stable handling of the motorcycle. Do not remove or change any wheel balance weights. When wheel balancing is required, see your authorized Honda dealer. Wheel balancing is required after tyre repair or replacement.
- To avoid possible repair failure and tyre deflation that may result in a loss of vehicle control, do not exceed 80 km (SO mph) for the first 24 hours, or 130 km (80 mph) at any time, after tyre repair.
- Replace the tyre if the sidewall is punctured or damaged. Sidewall flexing may cause repair failure and tyre deflation that may result in a loss of vehicle control.
CAUTION:
- Do not try to remove tubeless tyres without special tools and rim protectors. You may damage the rim sealing surface or disfigure the rim.
- When replacing tyres, use the same tyres those listed on the tyre information label. Use of other tyres on the model equipped with CBS/ABS/TCS may impair proper ABS and TCS function.