Frame, wheels & brakes
FRONT WHEEL REMOVAL
- Wheel removal requires mechanical skill and professional tools such as a floor jack and torque wrench. We recommend it be done only by your authorized Honda dealer or other qualified mechanic.
NOTE:
- For some temporary tubeless tyre repairs, wheel removal may not be necessary. See pages 32, 33.
Refer to Maintenance Precautions on page 69.
- Raise the front wheel off the ground by placing a support block under the engine, being careful to avoid contact with exhaust pipe and front lower cover.
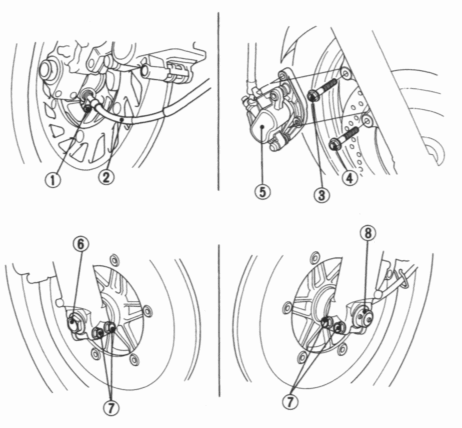
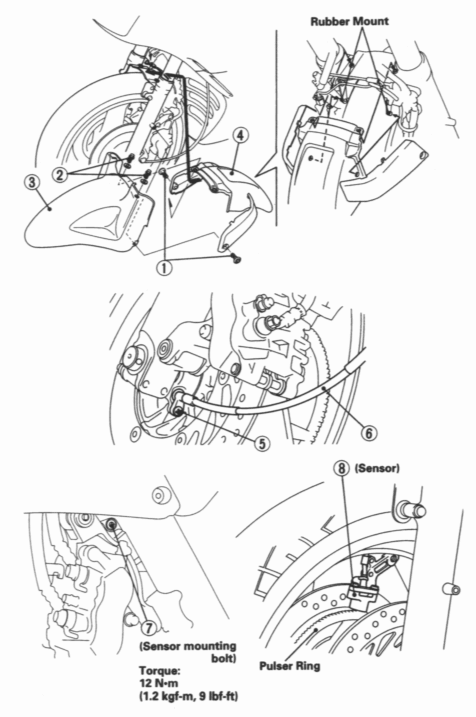
- Remove the parts in sequence, according to the order in the illustration.
NOTE:
- When removing and installing the wheel, be careful not to damage the sensor and pulser ring (Model equipped with CBS/ABS/TCS).
CAUTION:
- To avoid damage to the brake hose, support the caliper assembly so that it doesn't hang from the hose. Do not twist the brake hose.
- Avoid getting grease, oil or dirt on the disc or pad surfaces, because such contamination can cause poor brake performance or rapid pad wear after reassembly.
NOTE:
- Do not depress the brake lever (CBS/ABS/TCS: brake lever and brake pedal) when the wheel is off the motorcycle. The caliper pistons will be forced out of the cylinder with subsequent loss of brake fluid. If this occurs, servicing of the brake system will be necessary. See your authorized Honda dealer for this service.
For related torque specifications, see page 89. The numbers indicate the sequence of disassembly.
For standard model:
For Model equipped with CBS/ABS/TCS:
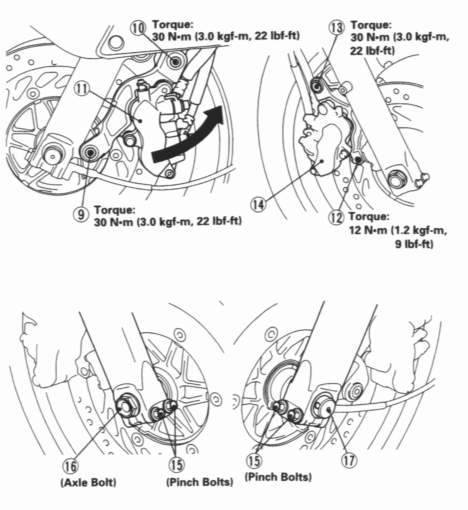
Installation
- Reassemble removed parts in the reverse order of removal.
NOTE:
- When installing the wheel, position the speedometer gearbox so that the lug on the gearbox is against the rear of the stopper lug on the left fork.
To install the sensor:
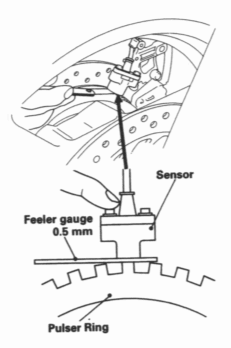
- Turn the front wheel so one of the poles of the pulser ring and sensor face each other.
- Insert a feeler gauge 0.5 mm furnished in the tool kit between the sensor and pole, then hold the sensor lightly against the pole.
- Tighten the sensor mounting bolt securely.
Specified torque: 12 Nm (1.2 kgf-m, 9 Ibf-ft) - Remove the feeler gauge,
- Rotate the front wheel one full turn to make sure that the pulser ring does not interfere with the sensor.
CAUTION:
- When installing the wheel, fit both brake discs carefully between the brake pads to avoid damaging the pads.
- Measure the clearance between the outside surface of the left brake disc and the left caliper holder with a 0.7 mm (0.028 in) feeler gauge. If the gauge inserts easily, tighten the right and left axle pinch bolts to the specified torque.
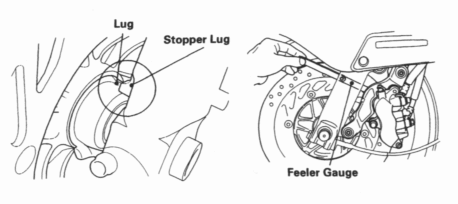
Specified torque:
- Axle bolt: 89 N-m (9.0 kgf-m, 65 Ibf-ft)
- Axle pinch bolt: 26 N-m (2.7 kgf-m, 20 Ibf-ft)
 If a torque wrench was not used for installation, see your authorized Honda dealer as soon as possible to verify proper assembly. Improper assembly may lead to loss of braking capability.
- If the feeler gauge cannot be inserted easily, pull the left fork outward or push inward until the gauge can be inserted and tighten the axle pinch bolts with the gauge inserted.
- After tightening, remove the gauge. After installing the wheel, apply the brakes (CBS/ABS/TCS: brake lever and brake pedal) several times, then recheck both discs for caliper-holder-to-disc clearance. Do not operate the motorcycle without adequate clearance.
- Failure to provide adequate disc-to-caliper-holder clearance may damage the brake discs and impair braking efficiency.
For model equipped with CBS/ABS/TCS:
CAUTION:
- After installation, operate the brake lever and brake pedal and check the brake operation.
REAR WHEEL REMOVAL
- Wheel removal requires mechanical skill and professional tools such as a torque wrench. We recommend it be done only by your authorized Honda dealer or other qualified mechanic.
NOTE:
- For some temporary tubeless tyre repairs, wheel removal may not be necessary. See page 32, 33.
Refer to Maintenance Precautions on page 69.
- Place the motorcycle on its center stand.
- Remove the parts in sequence, according to the order in the illustration.
NOTE:
- In case that the final driven flange tends to stay in the final drive spline, push the driven flange into the wheel by the pliers as shown number (7).
- When removing and installing the wheel, be careful not to damage the sensor and pulser ring. (Model equipped with CBS/ABS/TCS).
For related torque specifications, see page 92. The numbers indicate the sequence of disassembly.

Installation Notes:
- Reassemble removed parts in the reverse order of removal. However, before tightening the axle holding bolt, tighten the axle nut to prevent misalignment.
- Before installing the rear wheel, check that the wheel hub and final drive gear splines are coated with grease.
- Be sure the splines on the wheel hub fit into the final gear case.
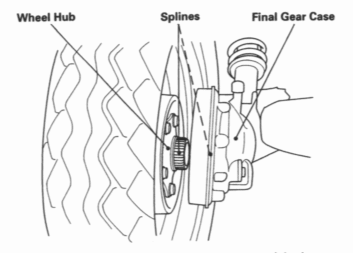
- Tighten and torque the following nuts and bolts:
- Axle nut torque: 108 N-m (11.0 kgf-m, 80 Ibf-ft)
- Axle holding bolt torque: 26 N-m (2.7 kgf-m, 20 Ibf-ft)
 If a torque wrench was not used for installation, see your authorized Honda dealer as soon as possible to verify proper assembly. Improper assembly may lead to loss of braking capacity.
 - Apply the brake several times and check for free wheel rotation when released.
For model equipped with CBS/ABS/TCS:
- Brake system inspection (See page 94).
CAUTION:
- After installation, operate the brake pedal and check the brake operation.
BRAKE PAD WEAR
Refer to Maintenance Precautions on page 69. Brake pad wear depends upon the severity of usage, the type of riding, and road conditions. (Generally, the pads will wear faster on wet and dirty roads.) Inspect the pads at each regular maintenance interval (page 66).
Front/Rear Brake
Check the cutout in each pad. If either pad is worn to the cutout, replace both pads as a set. See your authorized Honda dealer for this service.
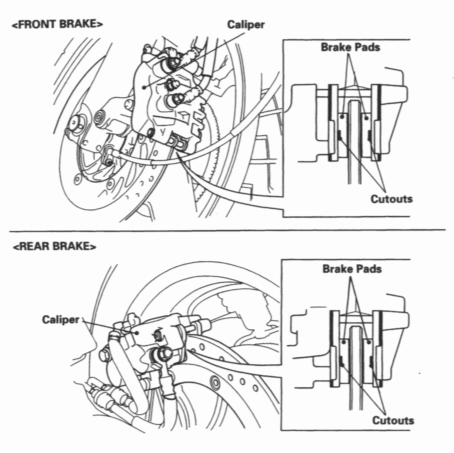
BRAKE SYSTEM INSPECTION
For model equipped with CBS/ABS/TCS:
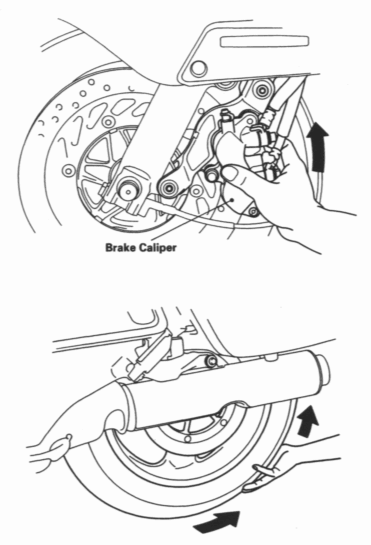
Refer to the Maintenance Precautions on page 69. Check the Dual Combined Brake System as follows:
- Place the motorcycle on its center stand, stop the engine, and place the transmission in neutral.
- Move the left brake caliper upward while slowly rotating the rear wheel. The brake system is normal if the rear wheel stops. If the rear wheel does not stop, see your authorized Honda dealer.
SIDE STAND
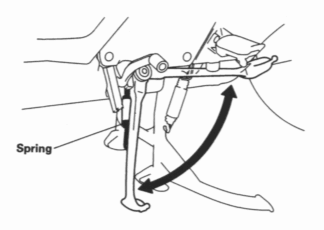
Refer to Maintenance Precautions on page 69. Check the side stand system for proper function.
- Check the spring for damage or loss of tension and the side stand assembly for freedom of movement.
- Check the side stand ignition cut-off system:
- Sit astride the motorcycle; put the side stand up and the transmission in neutral.
- Start the engine and with the clutch lever pulled in, shift the transmission into gear.
- Lower the side stand. The engine should stop as you put the side stand down.
If the side stand system does not operate as described, see your authorized Honda dealer for service.
